This will be a series of tutorials on basics of Android app
development. Although I won’t get too much deep into the practicalities
of Android app developement (you have YouTube tutorials for that), but I
will try to focus more on the concepts involved.
So, let’s begin!
This is the project structure of a sample app called “Netphlix”. In your Android Studio, it will be displayed on the left sidebar of the window.
When we create a new Empty Activity in Android Studio, we will be provided with a boilerplate code. I created an Activity called FirstActivity and Android Studio created a Java file and an XML file for me.
FirstActivity.java
activity_first.xml
Here, I would like to make it clear that you don’t have to learn XML at all. If you have some familiarity with HTML or a similar markup language, it is more than enough. Android Studio has an excellent code completion mechanism and there are plenty of XML code snippets (related to Android) available online that you can just copy-and-paste and alter the parameters according to your needs. If you are too lazy to do that, then Android Studio offers a visual editor where you can just drag-and-drop UI elements and Android Studio generates the XML file automatically (although, I don’t recommend using visual editor unless you are using ConstraintLayout).
Now, before we move further, we will get familiar with some important terms: Intent and Context.
In the code example below, we are creating an instance of Intent class and specifying that we want to go from the FirstActivity (which is currently active) to the SecondActivity. Also, we want to put some payload data called “name” with value “nandan” for the
Of course, you need to place the above code in the OnClickListener of your Button, so that, SecondActivity will be launched when the Button is clicked.
It should also be noted that Intent is not just for navigating from one Activity to another. It is used to start a Service, can be used in Broadcast Receivers etc.
There is also something known as PendingIntent which is used to specify something that is to be done in future. It is used when you are dealing with AlarmManager (used to schedule tasks). But that is out of scope of these notes.
… page 2
So, let’s begin!
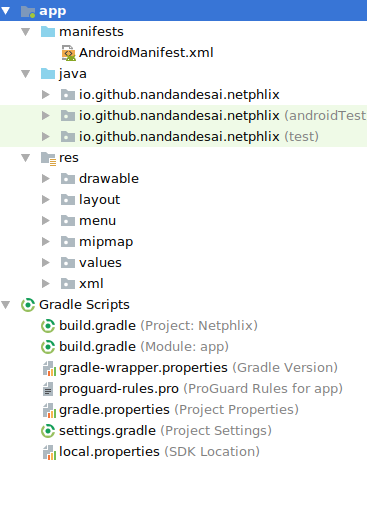
Project Structure
This is the project structure of a sample app called “Netphlix”. In your Android Studio, it will be displayed on the left sidebar of the window.
-
manifest: You can see a file called AndroidManifest.xml in a directory (folder) called manifests. This AndroidManifest.xml
file holds all the necessary information about the app. Information
like: what permissions your app requires to run (like Internet
permission, permission to access local disk, permission to access the
camera etc.), what all components your app has, name of the app, path to
the app’s icon image etc.
-
java: Next, you can see a directory named java.
This is where all the Java files that you write for your app reside.
All the app’s logic code, test code etc. are placed in this directory.
-
res: This is the folder where your resource files
reside. All the UI design code, your app’s icon image and any other
binary files required by your app. You can see a sub-directory called layout. This is where you will be spending most of your time while designing the UI of your app.
-
gradle: Gradle is a software that is used to build your
project, i.e., compile Java files, generate JAR files, generate APK
files, run tests on your app and add/remove dependencies etc. Gradle
scripts are used to automate all the aforementioned processes. Android
Studio comes with a Gradle preinstalled.
App components
There are mainly four types of components in an Android app:-
Activity
-
Service
-
Broadcast receiver
-
Content provider
Activity
Activity is the most fundamental part of an app. It is the visible part of the app that is actively running. Each screen of your app is an Activity. During your app development, to create an Activity, you need to create an XML file in res directory and also create a Java file in java directory and this Java file is required to give life to that static XML design file. So, an Activity is composed by an XML file and a Java file (XML file to define the UI and Java file to write the logic). Of course, you don’t have to take the pain of creating these files. In your Android Studio, if you go to File » New » Activity, you will get a list of which type of activity you want to create. Select any one type of the Activity and Android Studio will create the Java file, XML file and it’ll do the required changes in AndroidManifest.xml file automatically.When we create a new Empty Activity in Android Studio, we will be provided with a boilerplate code. I created an Activity called FirstActivity and Android Studio created a Java file and an XML file for me.
FirstActivity.java
activity_first.xml
Here, I would like to make it clear that you don’t have to learn XML at all. If you have some familiarity with HTML or a similar markup language, it is more than enough. Android Studio has an excellent code completion mechanism and there are plenty of XML code snippets (related to Android) available online that you can just copy-and-paste and alter the parameters according to your needs. If you are too lazy to do that, then Android Studio offers a visual editor where you can just drag-and-drop UI elements and Android Studio generates the XML file automatically (although, I don’t recommend using visual editor unless you are using ConstraintLayout).
Now, before we move further, we will get familiar with some important terms: Intent and Context.
Intent
So, if you want to build a decent app which has multiple Activities, then how do you navigate from one Activity to another? Let’s say that you have a button in your 1st Activity. When that button is pressed, you want to go to another Activity. To do this, a class called Intent is used. You have to tell your ‘intention’ to the Intent class that you would like to go from the current Activity to another Activity. You can also give some “payload” data (which is optional) for the Intent class to carry it to the next Activity and it will do that for you.In the code example below, we are creating an instance of Intent class and specifying that we want to go from the FirstActivity (which is currently active) to the SecondActivity. Also, we want to put some payload data called “name” with value “nandan” for the
intent to carry it to the SecondActivity. When we call startActivity(intent);, the SecondActivity will be created and the payload data will be available in SecondActivity.Of course, you need to place the above code in the OnClickListener of your Button, so that, SecondActivity will be launched when the Button is clicked.
It should also be noted that Intent is not just for navigating from one Activity to another. It is used to start a Service, can be used in Broadcast Receivers etc.
There is also something known as PendingIntent which is used to specify something that is to be done in future. It is used when you are dealing with AlarmManager (used to schedule tasks). But that is out of scope of these notes.
… page 2
Comments
Post a Comment